
Overview
If you are one of the many people thinking of getting playing on a PC, but you prefer using your Xbox controllers, either wireless or wired, we’ve got you covered. Some people prefer to play on PC for powerful graphics or additional customization in settings.
Maybe you are playing Call of Duty: Warzone, Fortnite, or Overwatch, and you want to get better at these games. If you are more comfortable with your Xbox controller than a keyboard and mouse, here is how you can get set up.
Option 1 – Wireless
To connect wirelessly with an Xbox controller, you will need an Xbox Wireless Adapter. Some PCs have these built in, but if you are unsure, you likely don’t have one yet. The adapter looks like a USB drive and sells for about $20-$30. It can be found at any of your popular stores that have electronics such as Walmart, Microsoft, or BestBuy.
Here are the steps outlined by Microsoft with Windows 10 if you have the adapter:
- Turn on your PC and sign in.
- Plug the Xbox Wireless Adaptor for Windows into your PC. For more info, see: Set up the Xbox Wireless Adaptor for Windows
- Turn on your controller by pressing the Xbox button (the large X in the middle of the controll). When you turn on the controller, the Xbox button will start flashing.
- Press and hold the Pair button on the Xbox Wireless Adapter. A small light will flash for several seconds.
- Press and hold the Pair button on the top of the controller (the raised button). The Xbox button on the controller will flash more rapidly – this means your controller is searching for the Xbox Wireless Adapter. When connected, the Xbox button on the controller will stay lit.
If you’re using built-in Xbox Wireless:
- Turn on your PC and sign in.
- Turn on your controller by pressing the Xbox button for 3 seconds. When you turn on the controller, the Xbox button will start flashing.
- Press and hold the Pair button on the top of the controller (the raised button). The Xbox button on the controller will flash more rapidly—this means your controller is searching for a PC.
- On your PC, press the Start button , then select Settings > Devices.
- Choose Add Bluetooth or other device, then select Everything else.
- Choose Xbox Wireless Controller or Xbox Elite Wireless Controller from the list. When connected, the Xbox button on the controller will stay lit.
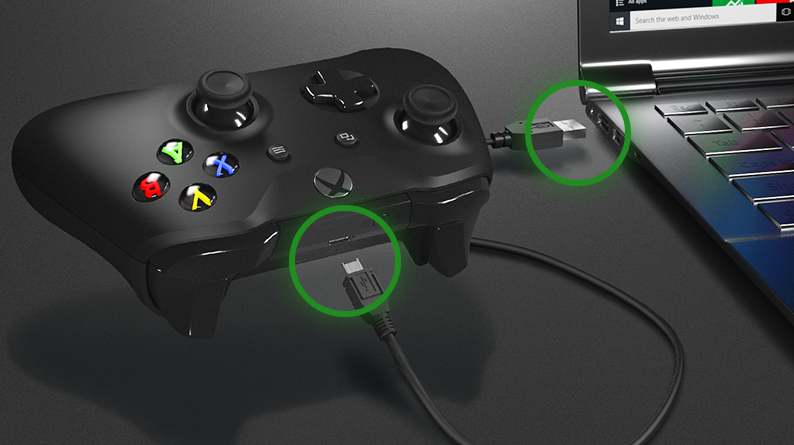
Option 2 – Wired (USB)
If you want to go the wired route, you can connect up to 8 controllers to your PC at a time. Simply connect the micro USB to your Xbox controller and connect to your PC.
Option 3 – Bluetooth
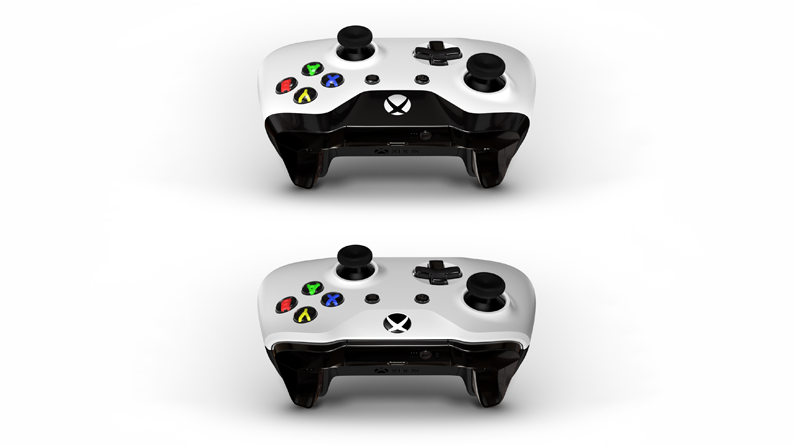
Many newer Xbox controllers are Bluetooth enabled. Check your controller to see if the Xbox logo is part of the controller portion, or the bumper portion. On older Xbox controller, the Xbox sign is on a completely different piece of the controller that is part of the bumpers, these do not have Bluetooth capabilities. You can see the difference in the image below. The first does not have Bluetooth capabilities, and the second one does.
- Turn on your Xbox Wireless Controller by pressing the Xbox button .
- Press and hold the Pair button on your controller for three seconds (the Xbox button will start flashing rapidly). The pair button is the small circular button somewhere between the two bumpers on the top of the controller.
- On your PC, press the Start button on your Windows taskbar, then choose Settings > Devices > Bluetooth & other devices.
- Turn on Bluetooth.
- Select Add Bluetooth or other device > Bluetooth. Your PC will begin searching for your controller.
- Select Xbox Wireless Controller or Xbox Elite Wireless Controller > Done.
2 thoughts on “How to Connect your Xbox Controller to your PC”
Comments are closed.